Spring Bean加载的三种方式
2024年4月14日
1.通过XML配置文件
package com.angu.bean.xml;
import lombok.Data;
@Data
public class XmlPerson {
    private String name;
    private String address;
    private Integer age;
}
通过bean标签配置XmlPerson类
<?xml version="1.0" encoding="UTF-8"?>
<beans xmlns="http://www.springframework.org/schema/beans"
       xmlns:xsi="http://www.w3.org/2001/XMLSchema-instance"
       xsi:schemaLocation="http://www.springframework.org/schema/beans
            https://www.springframework.org/schema/beans/spring-beans.xsd">
    <bean id="person" class="com.angu.bean.xml.XmlPerson"/>
</beans>
Spring容器会在启动的时候,会读取配置文件,解析bean标签后,会解析class属性配置的类名通过反射创建对应对象的实例。
2.通过Java代码
准备一个简单的Java Bean
package com.angu.bean.config;
import lombok.Data;
@Data
public class ConfigPerson {
    private String name;
    private String address;
    private Integer age;
}
Java配置代码
通过@Configuration表示这个类时一个配置类
通过@Bean生成一个Spring Bean
package com.angu.bean.config;
import org.springframework.context.annotation.Bean;
import org.springframework.context.annotation.Configuration;
@Configuration
public class ConfigJava {
    @Bean("person")
    public ConfigPerson getPerson(){
        return  new ConfigPerson();
    }
}
3.通过注解
准备一个bean,和上面两个不一样的地方是加了@Component注解,代表这个类可以被注解扫描器扫描到,并生成Spring Bean
package com.angu.bean.annotation;
import lombok.Data;
import org.springframework.stereotype.Component;
@Component("person")
@Data
public class AnnotationPerson {
    private String name;
    private String address;
    private Integer age;
}
context:annotatio 表示开启注解扫描
context:component-scan base-package="com.angu.bean.annotation" 代表只扫描
com.angu.bean.annotation这个包
<?xml version="1.0" encoding="UTF-8"?>
<beans xmlns="http://www.springframework.org/schema/beans"
       xmlns:xsi="http://www.w3.org/2001/XMLSchema-instance"
       xmlns:context="http://www.springframework.org/schema/context"
       xsi:schemaLocation="http://www.springframework.org/schema/beans
      https://www.springframework.org/schema/beans/spring-beans.xsd
      http://www.springframework.org/schema/context
       https://www.springframework.org/schema/context/spring-context.xsd">
    <context:annotation-config />
    <context:component-scan base-package="com.angu.bean.annotation"/>
</beans>
4.完整的测试
package com.angu.bean.test;

import com.angu.bean.annotation.AnnotationPerson;
import com.angu.bean.config.ConfigJava;
import com.angu.bean.config.ConfigPerson;
import com.angu.bean.xml.XmlPerson;
import org.springframework.context.ApplicationContext;
import org.springframework.context.annotation.AnnotationConfigApplicationContext;
import org.springframework.context.support.ClassPathXmlApplicationContext;


public class BeanCreate {
    /**
     * 通过Spring的XML配置文件,初始化Spring Bean
     */
    static void createBeanByXml(){
        ApplicationContext ac = new ClassPathXmlApplicationContext("spring-beans.xml");
        XmlPerson person = ac.getBean("person", XmlPerson.class);
        System.out.println(person);
    }

    /**
     * 通过Java代码来初始化Spring Bean,可以完全脱离XML配置文件
     */
    static void createBeanByConfig(){
        AnnotationConfigApplicationContext context = new AnnotationConfigApplicationContext(ConfigJava.class);
        ConfigPerson person = context.getBean("person", ConfigPerson.class);
        System.out.println(person);
    }

    /**
     * 通过注解的方式初始化Spring Bean
     */
    static void createByAnnotation(){
        ApplicationContext ac = new ClassPathXmlApplicationContext("spring-annotation.xml");
        AnnotationPerson person = ac.getBean("person", AnnotationPerson.class);
        System.out.println(person);
    }
    public static void main(String[] args) {
        createBeanByXml();
        createBeanByConfig();
        createByAnnotation();
    }
}
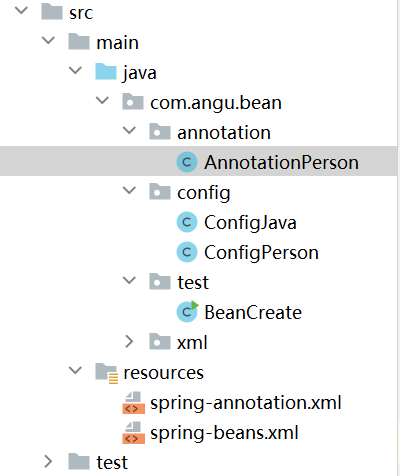
5.我的代码结构
